No matter what instrument you play, learning songs can be intimidating. Booking a gig with a lot of new material can be challenging to say the least. It can also leave you doubting your skills, memory, and chosen profession or hobby. For me, the biggest worry isn’t if I can play the music; it’s whether I can remember it. And, if I know I will be in a space where having charts on stage is frowned upon (which is almost 100% of the time), I get really anxious really fast. It’s even worse, of course, if I am booked as musical director. Even though I have proven to myself many times that I can remember the music, I am still a very visual person and feel way more comfortable with something I can glance at if I have a brain fart or brief moment of panic.
For that reason, I always chart the songs I have to play or MD. Even if I won’t have them on stage with me. That way I know that if all else fails, I can visualize my scribbles and get back on track. I can also see the chart in my head when I’m listening to the music in the car or on a walk. Plus, I don’t ever have to figure it out a second time. If there is a gap between my practice sessions, I can just read it down without fumbling through it.
There are probably a few of you out there thinking A) Ummm, can’t you just look up the chord changes online? or 2) Dude, I’m not educated enough or experienced enough to make my own, customized charts…well, here are my thoughts:
A) Yes, but those should just be used for reference as they are messy, may have information you don’t need to mess with, and may be wrong to varying degrees. They also don’t give you the connection to actually writing it out which helps the brain retain information. 2) Yes you are.
The beauty of it is, you don’t have to read notation or be super deep into Nashville Numbers to write out something you can follow. After all, it’s just for you; no one else has to understand it at all. You only need something that is easy for you to read and, if you’re like me, visualize while practicing away from your instrument.
Your chart needs to possess three characteristics:
- Clear and easy to read – clean lay out, written out repeated segments (when space allows), section indicators (V, C, B, and so on). **Also, the fewer the pages the better. Page turns never don’t suck.**
- Chord/note progressions (obvi).
- Cues – in/out points, hits, rhythmic cues, unison licks, etc.
The problem is, you can’t just grab a pencil and paper and start sloppin’ and moppin’ notes and bar lines on the page without having a ton of eraser marks, scribbles, and random marks that do more cluttering than guiding. It also won’t help you remember any of it (after all, the goal most of the time is to not actually need the chart come performance time). Plus, it’s not super efficient and, let’s face it, we need to get this done so we can start practicing.
Well, I gotchoo, boo. Here’s the technique I use to make charts clean yet informative while embedding it into my not-so-gifted dome. If it works for me, maybe it can work for you.
It’s a hybrid between active listening (when you listen to a song and make mental notes of structure, instrumental ins and outs, loud and soft parts, etc), structural analysis and melodic dictation techniques I learned in college. I have modified them to make them more powerful at the molecular level.
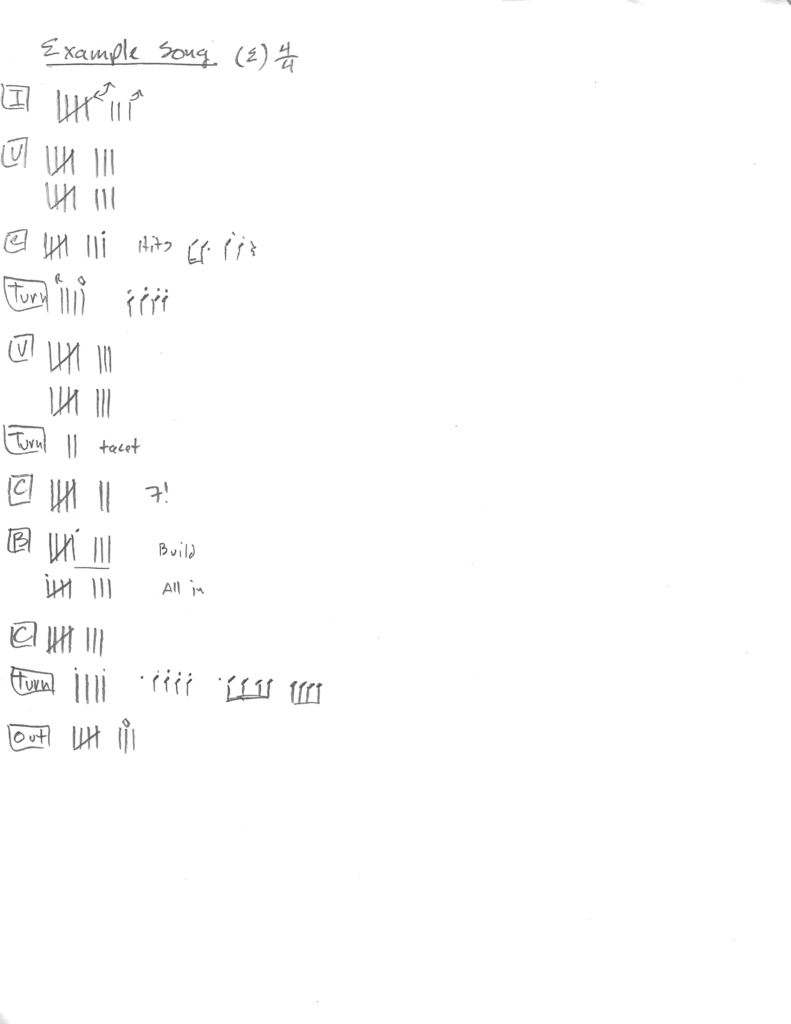
I call it a tally sheet or pre-charting and this is how you do it –
- Grab a blank page, a pencil or pen, and find a quiet place (if possible). You will totally need a device with you to listen to the song so grab one of them, too.
- Write the name of the song at the top – You will end up with a column of tally marks directly under the title so plan accordingly.
- Under the title and a little to the left, write a designation for the first section of the song (for example, “I” for intro, “V” for verse, and so on)
- Hit play on the song and make a tally mark for each measure until you hit the end of the section. Then, re-listen to the section and make marks for anything you need to remember (for instance, an arrow pointing to the tally mark where you come in) These marks can be anything you deem appropriate and feel free to write out a legend beside the group of tally marks.
- Continue the previous step until you have made it all the way through the song. Good news is, as you practice this, you’ll get faster and faster until you can do it without pausing or re-listening.
When you make it to the end of the song, go through and make notes of anything else you want to include in your chart. I use this space to work out any tricky rhythms or quickly jot down a run that I need to hit verbatim. At this point, you should have a pretty solid vision of what you need on the chart.
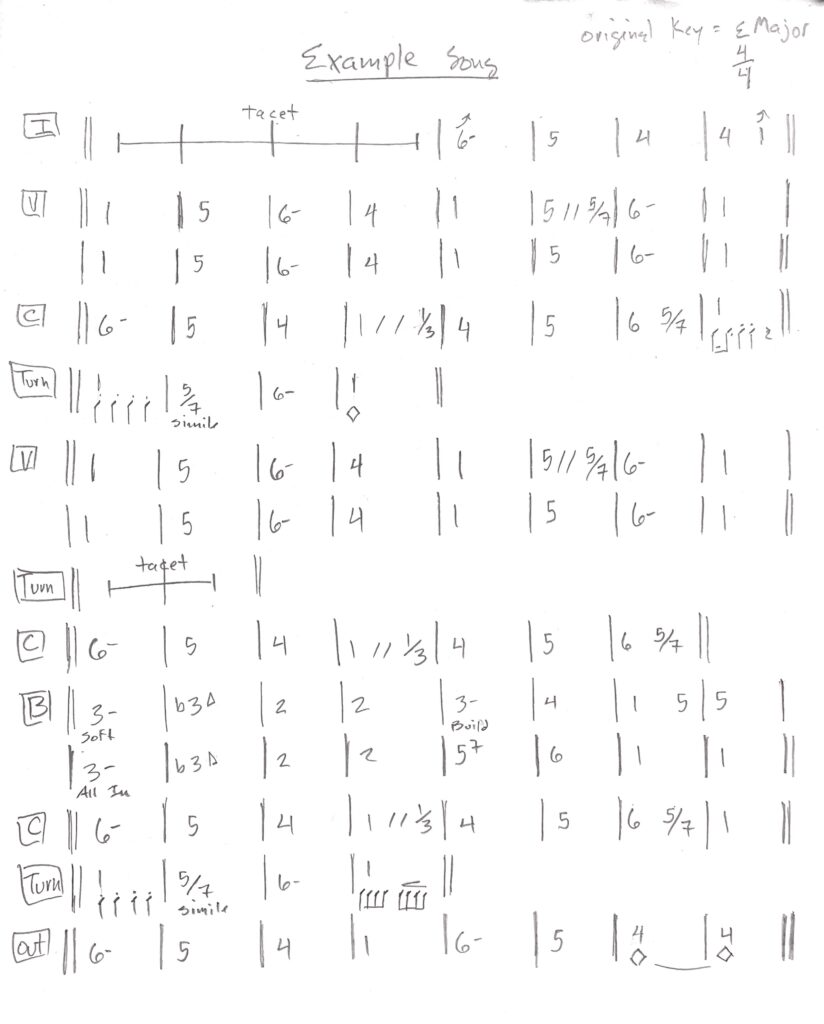
Now it’s time to write out the chart.
Start with the title at the top of the page and somewhere next to that write the original key. From there, treat it like you are writing paragraphs in English class – start on the left side of the page with a section designator (“I” for Intro, for example) then draw out the bar lines for that section as evenly spaced as possible and take into consideration that you want them to line up all the way down the page. **Eight measures per line/row usually works pretty well for pop/rock/country/etc.** This gives your brain a pattern and makes it easier for your eyes to follow. Do that again for each section leaving space in between the rows (systems, if you want to get technical) for any cues you need to add from your pre-chart. Try not to use repeats (though I get lazy and do it more than I should). Writing them out instead insures you don’t miss a jump back to another section, second ending, or the like. Remember, the idea is if you have to use it on stage, you can get all the info you need with a quick glance. So clear communication is key. Whether you use chord symbols or numbers, used widely recognized symbols or make up your own, as long as you remember what the short hand means, the system can be whatever works for you.
Below is an example of the tally sheet and resulting chart.


